From cardiovascular health to learning mechanical skills that easily translate to many other DIY needs, cycling is the gift that keeps on giving. After learning how to install and torque carbon fiber handlebars, the leaky sink was a piece of cake. The true test of my work on the sink was when I turned the water back on... success! No more water on the floor. I was, finally, after years of calling the plumber, a self-sufficient and responsible home owner.
The Big Question: What does it mean to be self-sufficient on a bike?
Answer: The ability to get yourself home safely without any help.
Though a variation of this answer can be "The ability to get yourself to a bike shop or to the next aid station in case of emergency." The benefits of true self-sufficiency are multifold, but essentially your world opens up once you no longer have to rely on the kindness of strangers. What's even better is that it feels great to help another rider by being one of those kind strangers when the need arises.
How do you acquire the necessary mechanical skills to achieve this level of self-sufficiency? The secret is that you only need to know how to deal with a problem on the bike you are riding. There are so many different kinds of bikes and components that it takes years to learn how to fix all of the bikes out there. Don't sweat everyone else's bikes, just worry about your own. For example, if you run electronic shifting such as eTap or Di2, you don't need to learn how to stretch the slack out of your derailleur cables after you install them. The electronics positions the derailleurs like a little industrial robot rather than relying upon your hand-power to move them up and down the gears. Also, you'll only need the few tools that your specific bike requires, so you won't need to carry anything extra. For example, my road bike's thru-axels require a 6mm hex tool for the rear hub and a 5mm hex tool for the front, so the first thing I made sure of when selecting a multi-tool that's with me at all times is that it had both a 6 and a 5mm hex tool.
Understanding how your specific bike needs to be maintained narrows down the sheer amount of stuff you need to learn about bicycle mechanics. With this in mind, YouTube can be your best friend. However, don't trust any shadetree mechanic with a camera's recommendation for torquing on your carbon-fiber frame or what chain lube to use (no... WD-40 is not a lube, it's a solvent.). Rather, get the type of advice that a manufacturer would recommend. I prefer my info from a trusted industry leader's channel, such as the Global Cycling Network (https://www.youtube.com/user/globalcyclingnetwork) or Park Tools (https://www.youtube.com/user/parktoolcompany). When I'm not in the shop with good WiFi or just feel like reading rather than watching, I visit the coolest, old-school (but up to date) DIY bike site out there—the famed Sheldon Brown's Bicycle Technical Info site. Check out the Flat Tire page for a quick view: https://www.sheldonbrown.com/flats.html.
If you, like me, have a deep thirst for learning how learning how to fix all bikes - a weeklong bike mechanic overview class from a reputable school like Oregon's United Bicycle Institute (https://www.bikeschool.com/) will give you the ability to take a wrench responsibly to most bicycles out there. If you just want to get home from your Sunday ride in time for dinner, local bike shops and retail outlets ofter short classes that will give you the basics and then some toward your goal of self-sufficiency. REI provides basic bike maintenance classes nationally: https://www.rei.com/events.
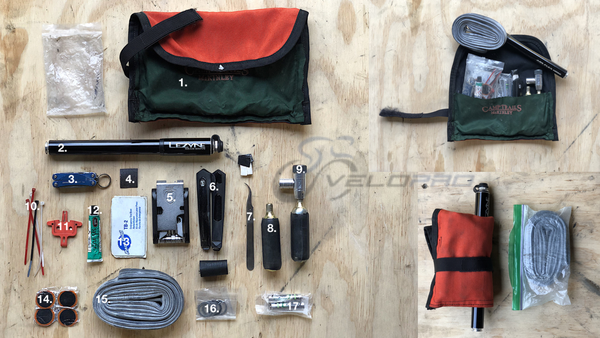
I ride an average of seven to eight thousand miles every year. I often find myself far away from any services or people, just rolling along at a measured pace taking in the scenery and lost in thought. It's not uncommon to be startled back to reality with a flat tire, the most common mechanical failure on a bike. You can tune your bike perfectly before a ride, greatly alleviating the chance of many mechanical failures to occur during the ride - new chain, wheels trued and spokes at the right tension, hydraulic or mechanical brakes serviced, headset tight, front and rear mech dialed in to surgical perfection, etc. But even on a brand new bike right off your LBS's floor, a goathead thorn or pinch-flat can occur. What's the best way to prepare for the unexpected on a ride? If you're like me, you try to make riding your bike as easy as possible by leaving at home any non-essential item that you won't absolutely need on the bike. Yes, I am a certified Weight Weenie, and I weigh everything obsessively in an attempt to, gram by gram, shave off extra pounds from the bike.
With self sufficiency and performance as my top priorities, my rear center jersey pocket has evolved into an efficient quick repair kit that's with me on every ride of a hundred miles or less. On rides greater than that, I'll add onto my kit depending on the type, commitment and length of the ride. Utilizing frame bags only if necessary, with add-ons such as more tubes, spare spokes, a spare derailleur hanger, lube and a small cloth, etc.
For rides of a hundred miles or less, my rear center jersey pocket always has the following in it. The fit is snug and comfortable nestled into my lower back, forgotten about until needed:
For a ride over 100 miles over the course of one day, I use a small saddle pack. The pump goes onto the frame and an additional tube goes into the pack (2 total), freeing up my rear center jersey pocket for additional food. I've found that a 7-10" baguette sandwich and a baked sweet potato (wrapped in tin foil baked in olive oil and sea salt) make for a perfect jersey lunch-box experience on an epic day.
Part of the fun is making your own repair kit specific to your needs. Everyone has their own version - a tool their mom gave them, half a toothbrush to deal with a muddy chain, etc. Once you're comfortable with not just fixing your tire when you get a flat, but knowing that you can deal with a frozen chain link or some other unexpected mechanical situation when you're out on a long ride, you've taken a significant step toward being able to enjoy your next big ride without the fear. You’ll have all the tools you need to always make it home... but... do you have the legs? Clip in to VeloPro.bike to make sure you're covered.